DMON install & use
Installing DMON
Licensing
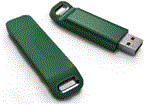
DMON is supplied with a dongle like those pictured here, or with a software evaluation license. The dongle contains the license information for the software. Licenses on a dongle may be permanent, for a fixed time period, or for a fixed number of executions. Evaluation licenses can be upgraded to permanent licenses after purchase of the product without requiring a new dongle. Dongle drivers are usually required to be installed once on the PC running DMON. The install program is located in <DMON-Install-Folder>\etc\HASP Older PCs running XP may require Microsoft IIS (Internet Information Services) to be installed. Installation instructions for software evaluation licenses are provided with the DMON evaluation pack.
If DMON's client-server option is used a license is needed for the server DMON only, no license is required with the client DMON.
Installation Procedure
On Windows run the installation program DMON-<version>-Setup.exe and follow the on-screen instructions. On Linux copy the installer DMON-<version>-Linux-x86-install to the system and change its permissions to executable with chmod. Run the installer and follow the on-screen instructions. If no on screen instructions appear, see section 2.2.1
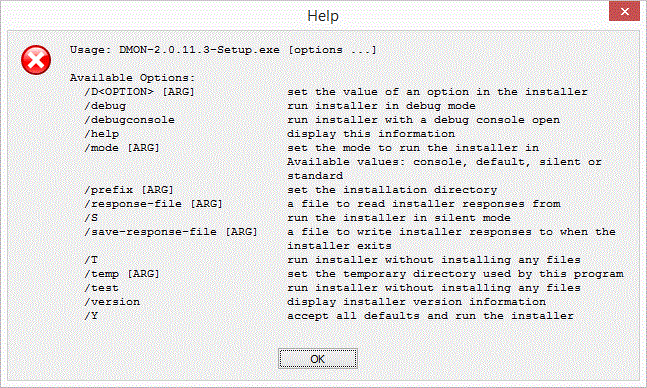
Note that it is possible to pass parameters to the installer and run it on the command line, /help on Windows or –help on Linux lists the options.
Whether you use the installer in command line mode or GUI mode, there are only a couple of configurable elements to the installation process; firstly the path to the installation, and secondly the on the final page in which you can choose to create shortcuts for the installed program.
License drivers on Linux
The <DMON-Install-Folder>/etc/HASP directory contains the drivers needed to handle the license dongle. If this is the first time DMON has been installed the appropriate drivers must be installed. Extract the files in the archive for your Linux distribution and install according to the ReadMe. This will require root privileges.
Adding DMON to the path
On both Windows and Linux, the installer will add DMON to the user’s path. In Linux this is done by modifying the “.profile” file. This is normally read when a new terminal is opened, but depending on how the user’s shell is configured, it may be necessary to log out and back in for the path to be updated.
Removing DMON
The DMON installer creates an uninstall program to assist with removal of the product once you no longer have need for it. The uninstaller is accessible from the Add/Remove programs section in Windows Control Panel. Additionally, the installer can be invoked directly from the file system. If you navigate to the installation folder, you will find a program “uninstall” which you can double-click to run. You can also run this program from a command line. The uninstaller program will remove all program files originally installed. If you have any log files or other files that DMON uninstaller does not recognise, then the DMON uninstaller will leave those files on the file system at the end of the process. Note that DMON must be installed in an empty directory, and it may therefore be necessary to uninstall an older version of DMON before installing a later version.
Evaluation Licenses
Evaluation versions of DMON contain the following Sentinel runtime and license files in the EvalLicense folder.
aksusbd-2.2.1-i386.tar			Sentinel runtime and license installation files for Linux
haspdinst.exe				Sentinel runtime and license install for Windows
provisional_20150804_112414.v2c		Evaluation license which can be applied manually after runtime installation http://localhost:1947
To install the Sentinel runtime and evaluation license on Windows
- Install the sentinel license drivers by running HASPUserSetup.exe in <DMON-Install-Folder>\etc\HASP.
- Open a command line window (as administrator).
- Enter the command "haspdinst -i" to install the runtime and license.
To install the Sentinel runtime and evaluation license on Linux
- Install the sentinel drivers by following instructions in ReadMe located at <DMON-Install-Folder>\etc\HASP
- Unpack the license files with the command "tar -xvf aksusbd-2.2.1-i386.tar"
- cd aksusbd-2.2.1-i386/
- Enter the command "sudo ./dinst" to install the runtime and license.
IMPORTANT NOTES
If an evaluation license has already been installed on the PC then a new evaluation license is required.
This evaluation license will not operate on a virtual machine.
Please request an extension 30 day license from support@ocetechnology.com.
Starting DMON
Overview
Before starting DMON the debug link to the target should be in place and the target SoC switched on.
A typical startup command might be
dmon -gui -ni -c myfile.txt -eth 192.168.0.95
This causes DMON to start the GUI, not initialize the target SoC, run a batch/script file, and connect through an Ethernet debug link to a target with the given IP address. The startup switches can be entered in any order.
If the target SoC has a plug-and-play area DMON reads this, reports the devices detected on the SoC, and loads the corresponding commands. If there is no plug-and-play DMON can read the rquired information from a configuration file.
Details of the startup options and associated switches can be found here.
This section deals with SPARC targets. For ARM processors see ARM support.
Direct link to the target
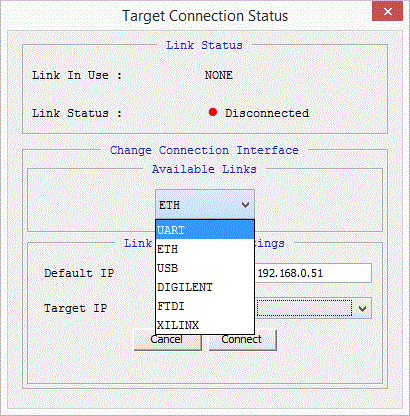
DMON requires a debug link to connect to the target. This link can be configured using command line options. If DMON fails to connect with the command line options given, an attempt can be made to specify a different link after start-up, by specifying the command line option at the console. For a target which has multiple debug link interfaces, the debug link can be changed while connected to the target by specifying the appropriate command or using a GUI widget which is accessed using the “Connect” menu item. This permits setting the parameters for the link, if any.
UART Debug Link
If no debug link option is specified, DMON will default to using the UART debug link, and will search for the first available UART on the machine. If it does not succeed in linking to a DSU on that port the available ports will be listed in the console.
The –uart command line option can be used to specify which of the available ports to use, e.g.
DMON –gui –uart 1 (on windows this selects the COM port with index 1)
or
DMON –gui –uart COM1 (on windows this selects the COM port by name)
DMON –gui –uart /dev/ttyUSB0 (on Linux this selects a COM port implemented by a USB-COM port adapter)
The debug baud rate can be set using:
-baud [integer] : nearest valid rate is used, current default 115200.
Valid rates are 9600, 19200, 38400, 57600, 115200, 230400, 460800.
At run time, if a UART debug link has been found on the target, the uart command can be used to switch to that link. The uart command has a single optional argument – the port number. Note that the link will not be changed if DMON determines that the board ID read from the link is different to the board ID read on initial connection.
Note that some combinations of CPU and BUS frequencies on the E698PM can cause intermittent connection problems on the DSU UART. If observed use a different baud rate to connect to the target.
Note that on Linux, particularly if a USB to UART convertor is being used, access to a UART may require root privilege. DMON can be run using sudo. Some data is stored in a folder /UserData in the user’s home directory. If DMON is run using sudo this is /root. Therefore it is recommended to change the permissions on the device:
 build@ubuntu:~/Desktop$ ls -asl /dev/ttyUSB0
 0 crw-rw---- 1 root dialout 188, 0 Apr 19 03:39 /dev/ttyUSB0
By using chmod to change the permissions you can avoid having to use sudo to run DMON on the UART.
 build@ubuntu:~/Desktop$ sudo chmod 666 /dev/ttyUSB0
 build@ubuntu:~/Desktop$ ls -asl /dev/ttyUSB0
 0 crw-rw-rw- 1 root dialout 188, 0 Apr 19 03:39 /dev/ttyUSB0
Ethernet Debug Link
The Ethernet debug link uses a proprietary protocol over a UDP link. Note that if multiple target boards of the same type are on the same subnet, there may be a conflict because the MAC addresses are the same causing confusion. The MAC address and the IP address of the debug link can be configured and are generally reset to a known value.
-eth	<IP> : Debug link to ethernet, optional IP, default 192.168.0.51 or set using –ip option
-ip	 [IP] : Set default IP address for use on ethernet EDCL debug link, default value 192.168.0.51.
This option will be ignored if an IP address was specified using the –eth switch. Note that the default IP address will be read on start up from the EDCL device, if present. This option is therefore deprecated.
-udp [int] : Default port to use with ethernet EDCL debug link, current value 8000. If DMON is unable to bind to this port, another port number will be autonomously chosen.
At run time, if an EDCL debug link has been found on the target, the eth command can be used to switch to that link if initially connected on a different link.
The edcl command allows some of the configuration to be performed.
CAUTION it is recommended not to use the edcl command except for display purposes when connected on the ETH link as you may change the parameters of the link, causing it to fail.
edcl Display EDCL configuration:
DMON > edcl

Link using Ethernet, target devices with EDCL:

	EDCL_0 	192.168.0.32	0xFF980000	enabled   ETH	192.168.0.32
	EDCL_1 	192.168.0.16	0xFF940000	enabled

	DEFAULT	192.168.0.32
edcl IP <index> Change the IP address of the EDCL.
If there is more than one EDCL on the board, change the once specified by index. Index refers to the index displayed by the EDCL command; this is determined on start-up and may vary if the initial connection was via an ETH link.
edcl enable <index> Enable the debug EDCL.
If there is more than one EDCL on the board, enable the once specified by index.
edcl disable <index> Disable the debug EDCL.
If there is more than one EDCL on the board, disable the once specified by index.
If it is necessary to change the MAC address (because there are several boards of the same type being added on the same subnet) this can be done using the write command and the address of the register, or using the GUI widget for the GRETH device in use.
USB Debug Link
-usb use USB debug link
The USB debug link requires that libusb has been installed on the host system. On a Linux system, nothing further is required. At present the USB link is only supported in Windows versions up to Windows 7, as later versions require Microsoft approved device drivers.
After installing libusb on a Windows system, carry out the steps below:
• Log in as a user with administrator privileges.
• Download (https://sourceforge.net/projects/libusb-win32/files/) the latest device driver binary package (libusb-win32-bin-x.x.x.x.zip).
• Extract it to a temporary directory.
• Use the INF-Wizard program to generate the INF file (modify the vendor and product IDs, which is 1781:0aa0 for USBDCL.
• Unplug the device(s) from the system. This is optional.
• Reconnect the device(s) to the system.
• When Windows asks for a driver, choose the inf-file(s) created above. Windows will warn that the driver is not 'digitally signed'. Ignore this message and continue with the installation. Since libusb version 1.2.0.0, a valid digital signature is embedded inside libusb0.sys for AMD/Intel x86_64 version of Windows so that the users can install the driver as well under 64bit x86_64 version of Windows Vista/7/2008/2008R2. Please read more about the Microsoft Kernel Mode Code Signing (KMCS) (http://www.microsoft.com/whdc/winlogo/drvsign/kmcs_walkthrough.mspx) policy for more information.
• Open the Windows Device Manager to verify that the device is installed correctly. Run the test program (testlibusb-win.exe) from the 'bin directory'. It should print out the descriptors of your device(s).
• A reboot isn't necessary.
• Starting from libusb version 1.2.1.0, the inf-wizard.exe has embedded driver binaries and provide an option to install the driver at the end of the process
SpaceWire Debug Link
-spw <IP address | port> <port> use a SpaceWire debug link
This provides support for the SpaceWire link and debug protocol used with the AGGA-4 chip. Please note that this protocol is not the same as RMAP. A different start-up switch (-rmap) can be used to create a debug link based on RMAP.
Connection to a target SoC over a SpaceWire debug link is done via an external converter. This accepts TCP/IP packets from a PC or workstation, converts these to SpaceWire packets, and passes them on over SpaceWire. Similarly in the reverse direction for SpaceWire packets originating on the target SoC.
The parameters allow the converter's IP address and TCP port be specified. If there is only one parameter and this is not a valid IP address DMON will attempt to evaluate this as a port. If parameters are omitted or invalid default values are used.
DMON supports the AGGA-4 SpaceWire debug port using the Shimafuji STANDALONE SpaceWire to Gigabit Ethernet router/bridge as the TCP/IP to SpaceWire converter. Other converter types may be added in the future.
The default IP is 192.168.1.100. The default TCP port is 10029.
RMAP Debug Link
-rmap <IP address:port> | <IP address> | <port> | <destination route > | <destination route # command source route>
This causes DMON to connect to the target using the remote memory access protocol (RMAP) available with some SpaceWire links.
Connection to a target SoC over a RMAP debug link is done via an external converter. This accepts TCP/IP packets from a PC or workstation, converts these to SpaceWire packets, and passes them on over SpaceWire. Similarly in the reverse direction for SpaceWire packets originating in the target SoC.
The RMAP protocol allows the target node in a SpaceWire network be identified using a destination route. This is made up of one or more node identifiers in the range 0 to 31, separated by spaces or commas. The RMAP route back to the source of the command, i.e. to the converter, is similar but restricted to no more than 12 nodes.
The TCP/IP address and port are used to access the converter. Some converters with multiple SpaceWire connections use the TCP port to determine which connection should be used. If a TCP port is not given, DMON uses the first node of the destination path to select the appropriate TCP port (or ports), and ensures that the last node of the source path corresponds, depending on the converter type. If both TCP port and destination route are given the first node of the destination route takes precedence over the TCP port.
DMON supports RMAP with the Shimafuji STANDALONE SpaceWire to Gigabit Ethernet router/bridge being used as the TCP/IP to SpaceWire converter. Other converter types may be added in the future.
For the STANDALONE the default IP is 192.168.1.100 and the default TCP port is 10029, corresponding to the SpW1 SpaceWire connection on the converter.
Examples (assuming the STANDALONE and the above defaults)
-rmap                                SpaceWire SpW1 link      TCP connection 192.168.1.100:10029  (default)
-rmap 3                              SpaceWire SpW3 link      TCP connection 192.168.1.100:10031
-rmap 2,0,5,#,3,6                    SpaceWire SpW2 link      TCP connection 192.168.1.100:10030
-rmap 192.168.1.100:10032            SpaceWire SpW4 link      TCP connection 192.168.1.100:10032
-rmap 192.168.1.100:10032 3,#,7      SpaceWire SpW3 link      TCP connection 192.168.1.100:10031  (given node overrides given TCP port)
Each node in the SpaceWire network, including the converter, has a logical address. This should be in the range 32 (0x20) to 254 (0xfe). Logical addresses may be the same when routes are relied upon, often the default value 254 (0xfe) is used.
-rmaplogicals converter_logical_address target_logical_address : allows the logical address of the converter and of the target be set
Each node in the SpaceWire network has a built-in key in the range 0 to 255. A RMAP command with a key that does not match the target key is rejected. An RMAP response that does not match the converter key is also rejected.
-rmapkeys converter_key target_key : allows the keys of the converter and of the target be set
The defaults are
Shimafuji Standalone key: 2 Target key: 0
JTAG Debug Links
If the JTAG debug link is implemented on the target then a JTAG connection can be used. Which connection options are used depends on what additional hardware is implemented to drive the JTAG interface, either in additional hardware or in an adapter which is part of the cable. Note that not every chip which has a JTAG interface implements an interface to the DSU which can be accessed via the JTAG interface. The JTAG clock speed must be less than one third the speed of the AHB bus for correct operation.
FTDI Debug Link
If an FTDI cable is being used, then the appropriate D2XX drivers for the host system need to be downloaded from http://www.ftdichip.com/Drivers/D2XX.htm and installed according to the instructions there.
-ftdi use ftdi JTAG link
-ftdilocid <ID> Set location ID to connect to FTDI if more than one FTDI cable is connected to the PC. DMON will display available location IDs, but will connect to the first one found.
-ftdispeed <INT> Set user defined frequency passed in MHz. Should be set to less than or equal to 1/3 of AHB bus speed. By default DMON uses a speed of 1 MHz for the FTDI link.
Operation is more reliable at LOW speed, HI speed operation depends on the implementation of the board. In particular flash programming may be unreliable at high speed.
libftd2xx-x86_64-1.4.6.tgz for x86_64
libftd2xx-i386-1.4.6.tgz for x32
1. tar xfvz libftd2xx-x86_64-1.4.6.tgz
This unpacks the archive, creating the following directory structure:
   build
       libftd2xx        (re-linkable objects)
       libusb           (re-linkable objects)
       libftd2xx.a      (static library)
       libftd2xx.so.1.4.6   (dynamic library)
       libftd2xx.txt    (platform-specific information)
   examples
   libusb               (source code)
   ftd2xx.h
   WinTypes.h
2. Change directory to build
cd build
3. Switch superuser
sudo -s
or, if sudo is not available on your system: su
Promotes you to super-user, with installation privileges. If you're already root, then step 3 (and step 7) is not necessary.
4. Copy the libraries to a central location.
cp libftd2xx.* /lib
5. Allows non-root access to the shared object.
chmod 0755 /lib/libftd2xx.so.1.4.6
6. Creates a symbolic link to the 1.4.6 version of the shared object.
ln -sf /lib/libftd2xx.so.1.4.6 /lib/libftd2xx.so
7. Enter command to list modules:
sudo lsmod
If "ftdi_sio" is listed:
Unload it (and its helper module, usbserial), as follows.
sudo rmmod ftdi_sio
sudo rmmod usbserial
And prevent from loading after reboot by adding exclusion to black list:
Create blacklist-ftdi-sio.conf
Add this line as it is : blacklist ftdi_sio usbserial
Save and copy to /etc/modprobe.d in your Linux system
8. Enter command to identify the VendorID and ProductID of of your usb(ftdi) device.
lsusb -vvv
(Find VendorID and ProductID with the name "Future Technology Devices Internetional")
9. Add permissions to USBtoFTDI cable :
- Use command "lsusb" to find cable vendor and product IDs
- Create file 10-local.rules
- Add these two line as it is :
     SUBSYSTEMS=="usb", ATTRS{idVendor}=="0403", ATTRS{idProduct}=="6014", GROUP="plugdev", MODE="0666"
     SUBSYSTEMS=="usb", ATTRS{idVendor}=="0403", ATTRS{idProduct}=="6010", GROUP="plugdev", MODE="0666"
- Copy file 10-local.rules  to /etc/udev/rules.d
- Edit /etc/udev/rules.d/10-local.rules as admin to modify vendor and product IDs for your cable taken using lsusb or add new line in that file
SUBSYSTEMS=="usb", ATTRS{idVendor}=="idVendor", ATTRS{idProduct}=="idProduct", GROUP="plugdev", MODE="0666"
(Example: SUBSYSTEMS=="usb", ATTRS{idVendor}=="0403", ATTRS{idProduct}=="6010", GROUP="plugdev", MODE="0666")
9. Restart machine
11. All done!
Digilent JTAG Debug Link
-digilent Use JTAG debug link with Digilent JTAG-HS1 cable
The Adept 2 runtime for the cable must have been installed, this can be downloaded from http://www.digilentinc.com
On Linux, libusb must be present for the Adept runtime to work. CAUTION: when the runtime is unpacked, the FTDI drivers must be installed before the Runtime (separate directory) in order for the runtime to work.
Xilinx Platform USB Cable
DMON supports Xilinx connection using the DCL9 or DCL10 cables. DCL10 is the default, if DCL9 is being used the product ID must be passed as shown below. The appropriate driver libraries for the cable must be installed, and accessing the cable also requires libusb to be available.
Consult Xilinx documentation for you cable on how to install the correct drivers.
-xilinx <ProductId> Use Xilinx USB to JTAG link, <Specify Product ID of XILINX device>
-xilinxindex <index> Specify the index of Debug JTAG Interface, if JTAG Chain has more than one device. By default device 0 is assumed. DMON lists the devices found on start up.
Remote Access
Target systems can be in short supply, and access for software developers can be a bottleneck, particularly when developers are at different sites. A target system itself may be in an environment not suitable for software debugging activities.
To help address this DMON can be used in a client-server configuration, with the target system connected directly to a DMON server, and a client DMON connected to this server over the Internet via an SSL secured link. A server option allows the client connection be restricted to certain client IP addresses only, or be left open to any DMON client. All connection activities are displayed on the server console and can be logged. No license need be present for the client DMON, the license is needed only for the server DMON.
The user on the DMON client is able to carry out all the functions available when connected directly to the target. Programs can be downloaded directly to the target as usual or to a sandbox on the server for subsequent loading into the target by the same or another client.
The user can ask for a session to be kept alive, and then shut down the client. This session then continues on the DMON server, and can be re-connected to later by any allowed client by giving the session-id.
In most cases the client DMON is started with the -gui option as usual, and the user will not detect any difference in performance compared to a direct connection with the target. If the additional latency due to the network link does become apparent, it may be better not to use the -gui startup switch and work just with the DMON console as this involves less network traffic.
The server DMON should be started before any client connection is attempted. It connects to the target and reports the server IP and port that should be used by the client when connecting. It then waits for a client connection. DMON server always starts in console mode. All interactions with a client are displayed on the server console and can be logged. A command allows the connection be terminated at the server, which then reverts to waiting for a connection.
To use DMON client server, local network settings and firewalls must be configured to allow the connection.
DMON server and DMON client are standard DMON installations, the client-server mode is selected by using startup switches as described below.
-server <IP|IP:port|port> Start DMON as a server.
When starting as a server, DMON reports the IP address and port on which it expects to receive connections. The remote client must use these to connect. By default, DMON will use and report the main IP address of the host computer, and use and report port 55555. Either or both of these default settings can be changed, but must be valid. A port number less than 49000 will be ignored; the default port will be used. If the IP address cannot be used on the host then DMON will not start in server mode. The -gui option is ignored if used.
-allowips [list] Server only, restrict connections to these IP addresses.
[list] is a comma separated list of IP addresses, or hostnames which can be resolved on the server.
-setdownloaddir [flepath] Server only, sets the sandbox directory to which the client can “download” program and script files.
-remote [IP] <port> Starts DMON as a client connected to a DMON server, to which it sets up a TCP/IP link secured with SSL.
IP is the internet address or hostname of the server DMON. <port> specifies the port. This must be the same as that selected on the server. The default port is 55555.
–session [String] Client only, reconnect to the server with [String] as session identifier, see below.
Keeping the session after client disconnects
This can be done using the keepsession yes command, which can be cancelled using keepsession no.
This command causes the server to report a session identifier to the client, and to keep the current session active after the client shuts down. This identifier is a random five digit number, and is displayed on the server screen as well as on the client.
To reconnect to an existing session, the client must be started with the -session switch giving the correct session identifier, e.g. –session 12345.
On reconnect, the client screen will display ‘Reconnected to Session Id: xxxxx’ and the server will display ‘Reconnected to existing session xxxxx from remote client: …….’
If after reconnect the client again uses the keepsession yes command, the same session identifier is used, making it unnecessary to modify the –session switch argument.
If a session is not currently active on the server the –session switch on the client is ignored. Otherwise attempts to connect will fail unless the correct session identifier is given.
After a client disconnects output for it is queued on the server, and passed to it when the client reconnects. It is best to avoid generating a lot of output in a session while the client is disconnected.
File Handling on the Server during remote access
The client can download files to a specific directory on the server. This directory can be specified when starting the server using the command line option -setdownloaddir. If this is not used, the directory defaults to the folder DMON/remote in the home directory of the user who started the DMON server.
The following commands are available to the client for file handling.
listdowndir List Download Directory on The Server.
Also shows a CRC32B checksum for the files to allow comparison between files on client and server with different clocks.
deldowndir [filename|all] Delete file filename or all files in download directory on the server
download [filename] Downloads a file to the remote server.
The file will be stored with the filename without path in the download directory.
rload [file] Load a program to the target from the download directory.
Any path specified is ignored, only the file name is used.
rcheck [file] Execute check command on the server. File must be present in the download directory.
Any path specified is ignored, only the file name will be used.
rscript [file] Execute script command on the server. Any path specified will be ignored.
Only DMON scripts are permitted, as running Tcl or Python scripts on the server would be a security risk.
rlog [file] Open a log on the server. Any path specified will be ignored.
rlogoff Close the last log opened on the server.
getuserlog [logfileName][fileName] Get Server's User Log (opened with rlog) and save to file locally.
Note: this can be used to fetch any file in the download directory.
getintlog [fileName] Get Server's Internal Log and save to file on client.
Other dedicated commands in client mode
Many commands issued on the client are actually executed on the server, in particular those commands that have a lot of interaction with the target. Examples include run, write, memset and various others. Some commands can be executed either on the client or on the server, to be executed on the server these should be prefixed with r. Examples are load filepath which loads an executable file from the client file system into target memory, and rload filename which loads an executable file from the download directory on the server into target memory as described above. Other examples:
rexamine [address] <length> Read and display memory from address. Default length 16 words.
rstop execute stop command on the server
Dedicated commands in server mode
The command console is available when DMON is being run as server. The available commands depend on the target hardware and can be listed by typing “help”.
There is one specific command, which allows a user at the server console to stop a client session.
endsession [sessionId] end the identified session - for use on server only
Startup commands
In <DMON Installation directory> on a Windows system there is a batch file which will start DMON. When started with no arguments, DMON will attempt to connect to the target by UART and will not display a GUI. However, the batch file will accept any of the command line options and pass them to the DMON process. On a Windows system it is convenient to create Desktop shortcuts with the options suitable for a particular target. The installation process will create a desktop shortcut which can be copied and modified. On a Linux system, or for use with Cygwin on windows, a bash script with similar functionality to the batch file is provided.
Common Operations
Overview
DMON is a software tool designed to enable SOC (system-on-chip) software applications to be debugged. It connects to the target over a dedicated communications link and issues commands to a debug support unit on the target which provides the necessary functions to debug the application. The DSU (debug support unit) allows reads and writes over the AHB on-chip bus. The debug interface supports LEON2, LEON3 or LEON4 debugging. Debug interfaces act as AHB masters providing their debug functions implemented in hardware. Thus no software support is necessary on the target.
Target initialisation
By default DMON will identify the target SoC by attempting to read the AHB plug and play area on the chip. DMON also supports specifying the devices on the chip using a configuration file, and has a number of built in SoC configurations. If the plug and play area cannot be read DMON will default to the Leon2 mode configuration which has a subset of known devices which are common to most Leon2 SoC.
Where the target does not support Plug&Play (PnP) DMON can accept command line options -brd [ID] to identify the board or the –leon2 switch to default to a minimum set of LEON2 devices. A configuration file can also be specified using the –cfg option. See Command Reference section for more detail.
Once the configuration has been established, DMON will probe the memory controlled by the SoC. This step can be bypassed by passing the –ni option. If a DDR controller is present DDR memory will still be probed unless the –niddr option is passed. Certain CPU and other registers will also be initialised.
Program debugging and testing
DMON provides extensive support for software debugging and testing. It allows the state of different functional units on the SoC be visualized as a program is running. Source level debugging using GDB is supported. Memory and device registers can be examined and changed. Hardware and software breakpoints and watchpoints, single stepping, code disassembly, cache analysis, and scripting in its own command language, TCL, or Python are some some of its features. Scripts can be triggered by events on the target. Data sets on the target can be monitored and displayed in a number of ways. If one or more ELF files are loaded, program symbols can be used in forming command parameters and are shown when code is disassembled. Information about program images currently loaded can be displayed.
Program image information
This is primarily metadata such as the sources of the files containing the loaded program images and parameters such as creation and modification dates and times.
By default, when a program is loaded DMON's information about previously loaded programs is deleted and only that for the program just loaded is kept.
The optional add[] parameter of the load and rload commands causes the previous information to be retained.
When an image is loaded, a unique image identifier string is created. By default this is the first part of the filename with internal whitespaces removed. The user can create an identifier using the add[] parameter. (The image identifier is used also as a source identifier when evaluating symbols.)
Image information commands
   iminfo <imageidentifier>	show metadata on specified image or on all images
   iminfodel		     delete all metadata and symbol information
Note that these commands relate only to DMON’s knowledge of what is present on the target and have no effect on the contents of target memory. Program images may be present in target memory but not known to DMON. Target memory areas may be cleared using DMON’s write command if required. DMON only knows about the images that have been loaded in the current DMON session.
Loading an application to the target
The load command can be used to load LEON software applications to the target system memory prior to execution.
The load command supports ELF32-SPARC, SRECORD and binary files for application code. Code and data sections are uploaded to their relevant addresses and the entry point address is used to load the program counter when started with the run command. Symbols are extracted from an ELF file and can be used as parameters for various commands – they are also used when displaying information about breakpoints etc. If a stripped ELF file was loaded (with no symbol information) symbols can be loaded later using the symbols command.
Since binary files contain no section information the data will be loaded to the specified start address. If no start address is specified it will be loaded to the start of the SRAM address area controlled by the memory controller.
Files can be selected using the file selection dialog from the menu – this is also available if the GUI is not. The file selected will be inserted in the correct position on the command line.
load [file] Load file. The file path may either be absolute or relative to the DMON working directory, see “cwd” command.
The file type is detected by examining the first few bytes – if these match the ELF identifier, then it is assumed to be an ELF file; If they match an SREC then it is an SREC file, otherwise it is treated as binary data.
load bin [file] Load a file, force it to be treated as binary.
load [address] [file] Load a file to address, if it is a binary file. For ELF or SREC, the address parameter will be ignored.
load bin [address] [file] Load a file to address, force it to be treated as binary.
check [file] Verify that the file corresponds to the contents of memory.
The file type is detected by examining the first few bytes – if these match the ELF identifier, then it is assumed to be an ELF file; If they match an SREC then it is an SREC file, otherwise it is treated as binary data. Binary data will be searched for at the start of RAM.
check [address] [file] Verify that the file corresponds to the contents of memory starting at address, if it is a binary file. For ELF or SREC, the address parameter will be ignored.
ep [value] <cpu#> When the run or go command is executed, DMON initialises the PC and NPC of each CPU core before starting the processor. By default this is with the entry point from the latest ELF file loaded. The “ep” command allows changing that value. By default the active CPU (see cpu command) will be modified, but a specific CPU can be specified.
symbols <file> show/load symbols from ELF file
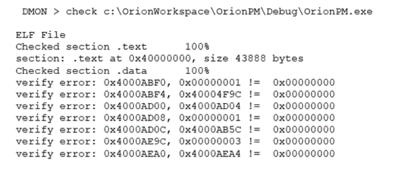
The check command can be used to verify that that program has been uploaded correctly. Differences will be shown as seen below:
Note that differences in the data section are to be expected if the program was run. Unless the program modifies its own source code there should be no difference in the text section.
Load command add[] parameter
This causes DMON's information about the image being loaded to be added to that for the images already present. If not used, DMON’s internal information on images previously loaded is deleted when a program is loaded.
The add[] parameter has a number of optional sub-parameters, allowing the user identify which CPU is to be used with this image, and to define an image identifier to use instead of the default.
When no add[] parameter is used, the load and rload commands set the PCs of all CPUs on the target to the starting address of the image.
If the add[] parameter is used, the user can select the CPU to use with the image. If this is not selected the image start address is not transferred to any CPU’s PC.
Add parameter options (in all cases the information on previously loaded images is kept):
   add[]	             PC is not set, image’s default identifier is used
   add[cpu,identifier]	PC of cpu is set to image start address, identifier is used instead of the default
   add[CPUx]             PC of CPU x is set to image start address, 'CPUx' used as identifier
   add[cpu], add[cpu,], add[cpu,””]    PC of cpu is set to image start address, default identifier is used
   add[identifier], add[,identifier]   PC not set, identifier used instead of default
The cpu and x above must evaluate to an integer 0,1,2,... that corresponds to one of the CPUs on the target. If not it is ignored and a warning given to the user.
The identifier above must begin with an alphabetic character or underscore ‘_’. It should not contain control characters or the characters ‘,’ ‘:’, ‘[‘ or ‘]’. If it is illegal or not present the default identifier for the image is used.
Note: the iminfodel command can be used to remove all internal DMON information on previously loaded images.
Running an application
After loading an application the run command is used to start execution of the program, after initialising the target. If the go is used execution is started at the specified address, but without initialising the target.
The stack pointer is normally initialised by DMON to the top of RAM found during the memory probe. The same value is applied to all CPU. This can be modified using the stack command; it is important to modify it if more than one core is running and stack management is not handled by the application software itself.
run <addr> start execution at entry point or address
go <addr> start execution without initialization
halt stop program on board
step <n> single step one or [n] times
continue continue execution after program was halted by user or debug unit
stack <value> <cpu#> display stack pointer or change initial value for cpu/cpuall. Changes active cpu if none is specified.
profile enable enable collection of profile data, periodically sampling the PC
profile Display profile information collected previously
profile disable Disable collection of profile data.
Setting break and watch points
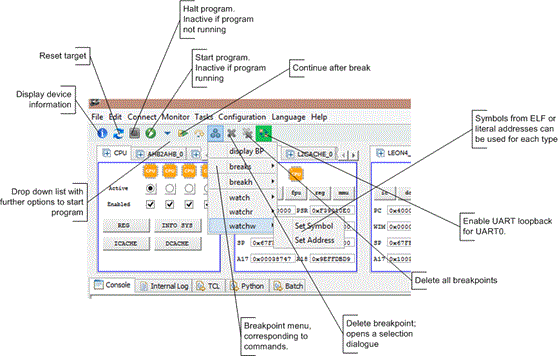
breaks and breakh are used to add instruction breakpoints. The breaks command adds a software breakpoint by inserting the (ta 1) trap instruction at the specified address. The breakh command uses the IU watchpoint registers for detection of the breakpoint thus eliminating the need to modify an application instruction by inserting a trap instruction. Where the code is executing from read-only memory only hardware breakpoints can be used.
The watch, watchr and watchw command can be used to detect access, read and write to memory. DMON allows the Hardware break/watchpoint registers in the Integer Unit of the CPU to be used to stop the processor when the specified address is read, written or fetched for execution. There are usually two such registers per CPU, DMON detects how many are actually implemented.
If the hardware registers are being used, DMON will combine commands which apply to the same address to use the same register – for example breakh address followed by watchr address will stop the processor when either the instruction is fetched for execution or the address is read. Only one set of registers will be used.
Note: When using symbols to set breakpoints, the address assigned to the breakpoint is that of the word after the value of the symbol: this is to ensure that the instruction at symbol has been executed when the breakpoint is detected. This is also consistent with typical GDB behaviour.
Commands accept a cpu argument – cpuN where N ins in the range 0 to number of cpus - 1 or cpuall if the command is to be applied to all CPU. By default commands will apply to the active cpu – see cpu command. The CPU argument is ignored for Software breakpoints, since these affect memory not CPU registers.
With no arguments the commands to set breakpoints simply list the breakpoints set:
breakh <addr|symbol> <cpu> display breakpoints or add hardware breakpoint
breaks <addr|symbol> <cpu> display or add software breakpoint
clear delete all breakpoints
clear [cpu] delete all breakpoints on a cpu. SW breakpoints are associated with CPU0 for the purposes of this command
clear [addr|symbol|number] <cpu> clear a breakpoint, specified by number from the list displayed, or by the address, or by the symbol. Software breakpoints will always be cleared with this command. HW break and watch points will only be cleared on the active CPU or the specified CPU
watch <addr|symbol> <cpu> display all breakpoint or add data watchpoint on read or write
watchr <addr|symbol> <cpu> display all breakpoint or add data watchpoint on read
watchw <addr|symbol> <cpu> display all breakpoint or add data watchpoint on write
The CPU command
In a multi-processor system, DMON needs to select a CPU to which some commands are applied. This is the “active” CPU. The DSU also allows a CPU to be disabled – this means that SW running on the target cannot use that CPU.
The cpu command allows these features to be controlled. They are also displayed and can be controlled from the GUI.
cpu Displays which cpu is active and whether the cpu are enabled. Example output:
DMON > cpu
cpu 0:  enabled  active
cpu 1:  enabled
cpu 2:  disabled
cpu 3:  enabled
cpu active n Select cpu n as the active CPU. By degfault commands which apply to a single cpu are applied to CPU 0. n must be in the range 0 to “number of cpu – 1”
cpu enable n Enable the cpu n for use. After reset typically all CPU are enabled.
cpu disable n Disable cpu n
GUI Features
Hardware breakpoints and watchpoints set through the GUI apply to the active CPU, see the cpu command.
Startup Options
Reference List
DMON supports the command line options below; further detail is provided according to category in the sections below.
| Option | Description |
|---|---|
| -abaud [integer] | Set default baud rates for UARTs (not debug UART) - nearest valid rate is used - current default 38400 |
| -allowips [IP IP1 ... IPn] | Set allowed IP/IPs/HostName in Server mode; comma or space separated list. |
| -arm | Start DMON in ARM mode and load ARM specific commands |
| -baud [integer] | Set serial debug baud rate to 9600,19200,38400,57600,115200,230400,460800;(default 115200) |
| -brd [S698T,S698MIL,AT697,AGGA4] | Specifies target board if no Plug-and-Play |
| -c [filename] | Read and execute commands from file |
| -cas [delay] | Programs SDRAM to either 2 or 3 cycles CAS delay. Default is 2. |
| -cfg [filename] | read board configuration from file |
| -cginit | Enable clock for all devices which have clock gating |
| -ddrinit | Initialise S698PM DDR2 PHY (specific to DDR2 and S698PM, mandatory option after cold start) |
| -device | specify the device for the Segger JLink (for ARM support) |
| -digilent | Use JTAG debug link with Digilent JTAG-HS1 cable |
| -echo | Echo batch commands to console |
| -eclipse | Redirect output from DMON console to default stdout console. This allows another program ֠for example eclipse ֠to capture the output and display it. |
| -edac | Enable EDAC operation (FTMCTRL only) |
| -eth <IP> | Debug link to Ethernet; optional IP - default 192.168.0.51 |
| -freq [double] | Set the system frequency in MHz overriding the attempt to calculate using the timer. |
| -ftdi | use FTDI JTAG link |
| -ftdilocid | Set location ID to connect to FTDI if more than one connected to the PC |
| -ftdispeed | Set user defined FTDI frequency passed in MHz |
| -gb2315 | Use GB2312 character set for displaying memory and UART data |
| -gdb <port> | Start GDB on start-up to listen on optional port - default 1234 |
| -grcg [enable|disable][all|bit..bitN] | Switch to Enable|Disable all, single bit or array of bits for GRCLKGATE_0 or -grcg_1 for GRCLKGATE_1, at DMON start up |
| -gui | Start DMON in GUI Mode |
| -help <option> | Show help for all command line options or one if an option specified after this option. DMON will exit afterwards. |
| -init [filename] | Run a script prior to initialisation |
| -iomx set [configName configName ...] | Switch to set IOMX configurations for Device or Array of Devices, when DMON starts |
| -ip [IP] | Set default IP address for use on ethernet EDCL debug link; current value 192.168.0.51. DEPRECATED. |
| -lang [language] | Change Language of Help file. Supported languages: English(en), Chinese(zh), Korean(ko), Russian(ru), Italian(it), Spanish(es). Sample: -lang zh |
| -leon2 | Use internal LEON2 configuration |
| -license <haspid> | Choose License key to use by setting HASP ID |
| -log [filename] | Append commands and responses to the specified log file |
| -mcfg1 [value] | Set the default value for memory configuration register 1 |
| -mcfg2 [value] | Set the default value for memory configuration register 2 |
| -mcfg3 [value] | Set the default value for memory configuration register 3 |
| -nb | Disable break on error traps (required for operating systems such as Linux which use traps) |
| -ni | Do not initialise target on start-up. (Note: DDR Memory if present will be probed) |
| -niddr | Do not probe DDR if present |
| -noflash | Do not probe for flash memory at start-up |
| -nolink | Do not use a debug link. For test purposes only. Not intended for users. |
| -noreadline | Disable DMON console (for use when DMON is being used in the background as a GDB remote target for e.g. eclipse) |
| -normw | Disables read-modify-write cycles for sub-word writes to 16- bit 32-bit areas with common write strobe |
| -nosdram | Disable SDRAM |
| -nosram | Disable SRAM and map SDRAM from the lowest address controlled by memory controller - usually 0x40000000 |
| -pageb | Enable SDRAM page-burst |
| -port [integer] | Specify port for use with -gdb or GDB command. DEPRECATED pass the port to -gdb instead. |
| -postinit [filename] | Run a script just after initialisation |
| -ppaddr [address] | AHB Plug & Play start address. Required if Plug and Play area is not at standard address (0xFFFFF000 or 0xEFFFF000 for N2X) |
| -prefix [String] | No effect without -echo. Prefix the echo of start-up batch commands with String (Note: spaces will be removed) |
| -preload | Load python libraries before first use. Speeds up python initialisation of python command is issued later. |
| -python | Set console language to python |
| -ram [ram_size] | Overrides the auto-probed amount of static ram. Size is given in Kbytes. |
| -rambanks [ram_banks] | Overrides the auto-probed number of populated ram banks. |
| -ramrws [waitstates] | Set waitstates number of waitstates for ram reads. |
| -ramws [waitstates] | Set waitstates number of waitstates for both ram reads and writes. |
| -ramwws [waitstates] | Set waitstates number of waitstates for ram writes. |
| -remote [ipaddress] <port> | connect to a DMON server at ipaddress and optionally on port - default port 55555 |
| -rex en | Enable REX mode on rex supported target |
| -romrws [waitstates] | Set waitstates number of waitstates for rom reads. |
| -romws [waitstates] | Set waitstates number of waitstates for both rom reads and writes. |
| -romwws [waitstates] | Set waitstates number of waitstates for rom writes. |
| -rsedac | Enable Reed-Solomon EDAC operation (FTMCTRL only) |
| -sampling_rate <rate> | Set Sampling rate in ms for GUI to be refreshed |
| -segger | Use Segger JLink (for ARM mode) |
| -server <ip address>:<port> | Listen for DMON client connections on IP address and/or port (default local host IP and port 55555). IP Address listened on will be printed to console. DMON must be able to bind a socket to this address and port. |
| -session [String] | Identity of existing session on server to which want to connect as remote client. |
| -setdownloaddir | Set directory on Server to keep downloaded files |
| -spw <IP> <port> | SpaceWire AGGA4 debug link over TCP/IP |
| -stack | Set initial value for stack pointer |
| -swd | use Segger JLink in swd mode (ARM mode) |
| -tcf | Start TCF Agent. More can be found in 'Debugging with Eclipse TCF' |
| -tcl | Set console language to Tcl |
| -trfc [val] | Programs the SDRAM trcf field in mcfg2 to represent val nanoseconds. |
| -trp3 | Programs the SDRAM trp timing to 3 (sets bit 30 in mcfg2). Default is 2. |
| -u <number or all> | Set uart (not debug uart) to loopback. Sets UART0 by default |
| -uart <name or port no> | Serial debug link. Optional device name or port number 0;1;.. default first available. e.g. on Linux art /dev/ttyUSB0 |
| -udip | Start DMON in User defined IP mode. Expects to find a THIRD_PARTY.JAR. see User Defined IP section. |
| -udp [int] | Default target port to use with Ethernet EDCL debug link - current value 8000 |
| -usb | use USB debug link |
| -utf8 | Use UTF-8 character set for displaying memory and UART data |
| -xilinx <PRODUCT ID> | use Xilinx USB to JTAG link; <Specify Product ID of XILINX device> |
| -xilinxindex <index> | Specify Debug JTAG Interface if JTAG Chain has more than one device |
Connection to the target
Options for connecting to the target are discussed in Srarting DMON along with the other details of the target link.
Configuring DMON
Some of the command line options are intended to modify the behaviour of DMON and do not affect the target. In particular, there are commands to modify the logging and display of start-up scripts.
| Option | Description |
|---|---|
| -echo | Echo batch commands to console. If this option is not used then commands in scripts run with the c option will not be echoed to either the console or the log file. |
| -prefix [STRING] | If the echo command is in use then the prefix will be prefixed to the commands echoed to the screen/log file. Note however that internal spaces will be removed from the string. |
| -log [FILENAME] | Log commands and output to the specified file. |
| -freq [double] | Set the system frequency in MHz overriding the attempt to calculate using the timer. This frequency is used in initialising memory and some other device initialisations where the correct value depends on the AHB bus speed. |
| -gb2312 | Use GB2312 character set for displaying memory and UART data |
| -gui | Start DMON in GUI Mode |
| -sampling_rate <rate> | Set Sampling rate in ms for GUI to be refreshed |
| -help <option> | Prints help for all command line options to stdout (not the DMON console). If an option is specified only the help for that command line option will be printed. DMON will exit afterwards. |
| -utf8 | Use UTF-8 character set for displaying memory and UART data |
Selecting a Target
DMON will detect the devices on a System on a Chip which implements the plug and play system at the expected address. For other systems, the configuration must be communicated to DMON. Some configurations are pre-coded in DMON and it only necessary to supply a command line switch. For others, a configuration file must be supplied. For ARM based systems, see ARM section.
| Option | Description |
|---|---|
| -brd [S698T,S698MIL,AT697,AGGA4] | Specifies target board if no Plug-and-Play |
| -cfg [filename] | read board configuration from file |
| -leon2 | Use internal LEON2 configuration |
| -ppaddr [address] | AHB Plug & Play start address. Required if Plug and Play area is not at standard address (0xFFFFF000 or 0xEFFFF000 for N2X recognised from the Board ID read at address 0xFFFFFFF0) |
At present two configuration file formats are in use, one for SPARC systems (used with the –cfg switch), one for ARM systems (XML format but not loadable from file in the initial version). Further configuration file formats and associated start-up switches may be added in the future. The configuration file format used for SPARC emulates what would be read from a plug-and-play area with the addition of comment lines, indicated by an initial #
vnd dev ahbstart ahbend                                       apbstart apbend   irq
01  02  90000000 A0000000 00000000 00000000 00000000 00000000 00000000 00000000   0  # DSU
04  02  00000000 00000000 00000000 00000000 00000000 00000000 00000000 00000000   0  # CPU
04  0F  00000000 1fffffff 20000000 3fffffff 40000000 7fffffff 80000000 80000008   0  # MEMCTRL
01  07  00000000 00000000 00000000 00000000 00000000 00000000 800000C0 800000CF   0  # Debug UART
The space separated columns are as follows:
1. Vendor ID
2. Device ID
3. 3 pairs of AHB start and end addresses
4. APB start and end addresses
5. IRQ Number
# defines a comment to the end of the line, which will be ignored.
(see also the savecfg DMON command)
Lines which contain errors will be ignored. The following error can occur
• one or more fields cannot be parsed as a hex number
• there are not 12 fields
DMON will accept configuration files with errors in the memory map, for example devices which overlap. However, a warning message will be printed to the console after initialisation.
Example error and warning messages, see below:
ERRORS/WARNINGS during configuration:
ERRORS/WARNINGS during configuration:
WARNING: line 22: Got 13 items, expected 11
WARNING: line 23: Got 11 items, expected 11
WARNING: Overlapping AHB addresses for 1:002 (line 21) and 4:00f (line 9): Start 0x50000000 < End 0x7fffffff
WARNING: Overlapping AHB addresses for 1:002 (line 6) and 1:002 (line 21): Start 0x90000000 < End 0xa0000000
WARNING: Overlapping AHB addresses for 1:002 (line 7) and 1:002 (line 6) : Start 1 0x00000006 == Start 2 0x90000000
WARNING: Line 17: Inconsistent APB address block for 4:009: Start 0x800000ae > End 0x800000ac
WARNING: Overlapping APB addresses for 4:017 (line 20) and 4:00f (line 9): Start 0x8000000c < End 0x80000010
WARNING: Overlapping APB addresses for 1:00c (line 12) and 1:00c (line 11): Start 0x80000074 < End 0x8000007f
WARNING: Overlapping APB addresses for 4:009 (line 19) and 4:009 (line 18): Start 1 0x00000012 == Start 2 0x800000b0
In Leon 2 mode DMON will ignore the plug-and-play area on the SoC (if present) and configure itself to work with the devices below at predefined bus addresses.
N.B. This is the default configuration, used if no plug-and-play area is found, or no DSU is identified in the plug and play area, and no other option is specified.
The default system is shown below:
LEON2 Debug Support Unit
8/16/32-bit PROM/SRAM/SDRAM controller
Programmable UART with APB interface x 2
LEON2 Interrupt Controller
LEON2 Configuration Register
LEON2 AHB Status Register
LEON2 SPARC V8 Processor
Serial/AHB debug interface
LEON2 Timer Block
LEON2 Write Protection Register
LEON2 Input/Output
Configuring the Target
| Option | Description |
|---|---|
| -ni | Do not initialise target on start-up. (Note: DDR Memory if present will be probed) |
| -niddr | "Do not initialise target on start-up, also do not probe DDR if present" |
| -noflash | Do not probe for flash memory at start-up. Commands related to flash which are specific to the device connected will not be available until initialised using the flash command. |
These options are designed to allow connecting to a target which is already executing a program without changing anything. Note that if the initialisation is not performed DMON will not be able to detect the properties of the attached memory and may not know the configuration of some devices. For example, the number of bits in timers is determined by writing to the registers and reading back what has been written. If –ni is used, then 32 bit timers and scalers will be assumed.
Initialisation at run time can be carried out using the init command.
On start-up DMON probes the memory attached to the chip depending on the memory controllers identified. The user can bypass this probe either partly or completely using a range of command line switches. Some of these take precedence over others. See also –ni and –niddr which bypass the memory initialisation as well as other initialisation steps. DMON will update the registers in the memory controller to reflect the memory identified by the probe.
| Option | Description |
|---|---|
| -cas [delay] | Programs SDRAM to either 2 or 3 cycles CAS delay. Default is 2. |
| -ddrinit | Initialise S698PM DDR2 PHY (specific to DDR2 and S698PM). Must be done once after power up. If not done when the DMON initialisation sequence attempts to read and write the DDR RAM area the debug link will be lost and the board will have to be reset. Note: on the N2X board a similar sequence is autonomously executed by DMON. |
| -edac | Enable EDAC operation (FTMCTRL only) |
| -mcfg1 [value] | Set the default value for memory configuration register 1 |
| -mcfg2 [value] | Set the default value for memory configuration register 2 |
| -mcfg3 [value] | Set the default value for memory configuration register 3 |
| -normw | Disables read-modify-write cycles for sub-word writes to 16-bit 32-bit areas with common write strobe |
| -nosdram | Disable SDRAM |
| -nosram | Disable SRAM and map SDRAM from the lowest address controlled by memory controller usually 0x40000000 |
| -pageb | Enable SDRAM page-burst |
| -ram [ram_size] | Overrides the auto-probed amount of static ram. Size is given in Kbytes. |
| -rambanks [ram_banks] | Overrides the auto-probed number of populated ram banks. |
| -ramrws [waitstates] | Set waitstates number of waitstates for ram reads. |
| -ramws [waitstates] | Set waitstates number of waitstates for both ram reads and writes. |
| -ramwws [waitstates] | Set waitstates number of waitstates for ram writes. |
| -romrws [waitstates] | Set waitstates number of waitstates for rom reads. |
| -romws [waitstates] | Set waitstates number of waitstates for both rom reads and writes. |
| -romwws [waitstates] | Set waitstates number of waitstates for rom writes. |
| -rsedac | Enable Reed-Solomon EDAC operation (FTMCTRL only) |
| -stack | Set initial value for stack pointer |
Note: there are commands which can be run when DMON is running to modify values in the memory control registers.
Scripts run at start-up and during initialisation
| Option | Description |
|---|---|
| -c [filename] | Read and execute commands from file; these will be run after start-up and initialisation |
| -init [filename] | Run a script prior to initialisation |
| -postinit [filename] | Run a script just after initialisation |
| -log [filename] | Append commands and responses to file |
DMON, Tcl or Python scripts can be specified on the command line to be run at particular points during start up. If a Tcl or Python script is specified a prior command or command line switch must have been specified for DMON to be in the correct mode: if a command line switch is used then the “shell” command must be issued in a script. Multiple scripts are executed in the order specified on the command line.
-init scripts are executed after the Plug and Play area or file is read to configure DMON, but before device initialisation is called. –postinit scripts are executed after DMON initialisation is complete.
Any valid DMON command may be used in these scripts; however the user needs to be aware of the side effects, attempting to run a programme prior to initialisation is likely to fail.
Running with GDB and/or an IDE
It is possible to configure many ideas to communicate with a GDB remote target; DMON can function as a remote target. If DMON is to be run in the background, the options below can be used. Otherwise – to have the GUI available for example – only the –gdb switch should be used.
| Option | Description |
|---|---|
| -gdb <port> | Start GDB on start-up to listen on optional port (default is 1234) |
| -eclipse | Redirect output from DMON console to default stdout console. This allows another program (for example eclipse) to capture the output and display it. |
| -noreadline | Disable DMON console (for use when DMON is being used in the background as a GDB remote target for e.g. eclipse) |
| -port [integer] | Specify port for use with gdb option or GDB command. (DEPRECATED; pass the port to -gdb instead.) |
User Interface
GUI
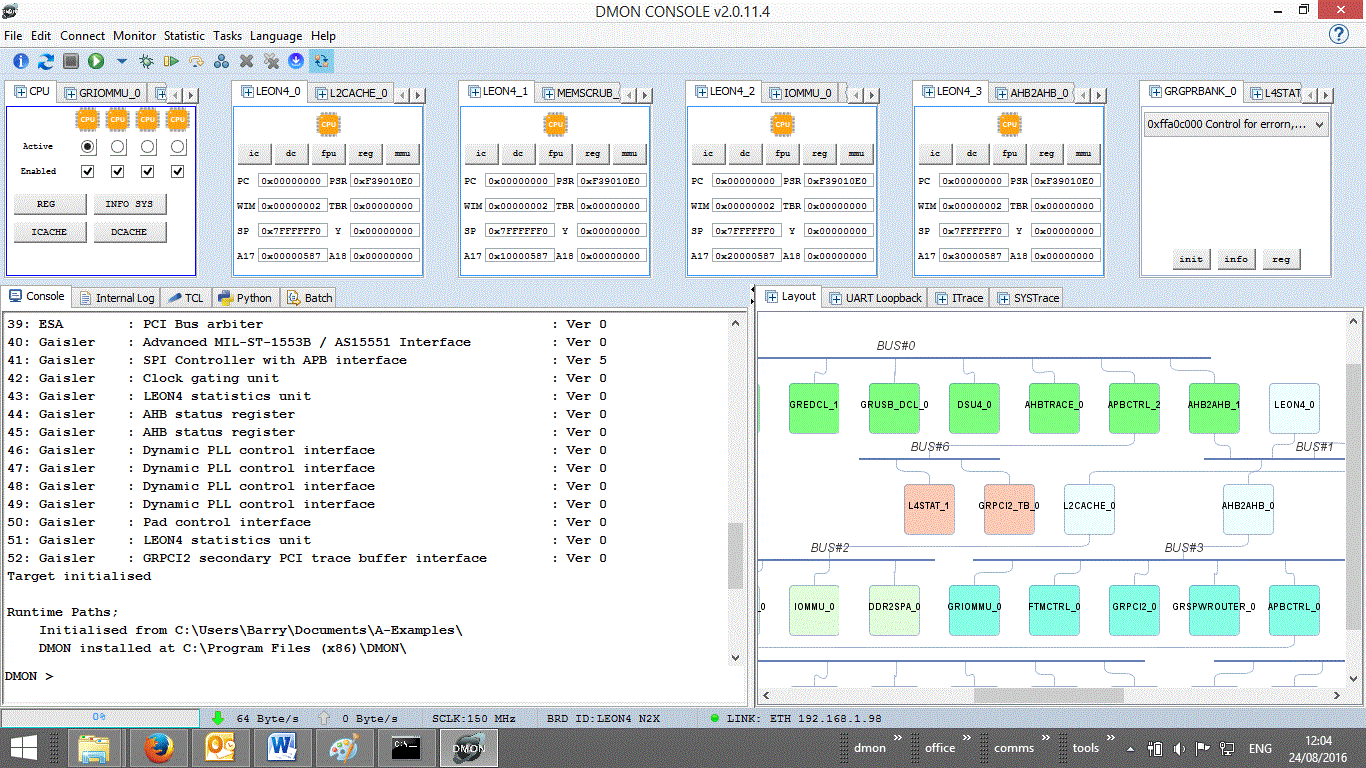
DMON has a rich GUI, divided into several regions.
There is a menu at the top
• File: opens a file selection dialog, selected file will be copied to the command line.
• Edit: allows copy and paste from the console. This can also be done using the mouse and the usual short cuts.
• Connect: connection dialog.
• Monitor: Data Monitor menu.
• Tasks: allows configuration of various automated tasks.
• RTEMS: RTEMS Thread display (available only once an RTEMS application has been loaded).
• Statistics: LEON4 Statistics module configuration and display.
• Language: Allows selecting the scripting language for DMON.
• Help: provides information about DMON
• List available DMON commands
Below the menu there are some buttons which control the running of programs, setting of breakpoints etc.
Below that is a row of widgets, one for each device identified on the target.
There are two tabbed panels below the widgets; on the left the default view shows the command console (which is also shown if no GUI is present); this panel also has tabs to show the internal log; and three tabs which act as scratchpads with syntax highlighting for Tcl, Python or plain DMON scripts. The right hand panel has 4 tabs. The Layout tab shows the configuration of the SoC. The UART Loopback tab separates the characters read from each UART loped back UART and permits enabling and disabling UART loopback for each one. The SYSTrace and ITrace panels are refreshed with the latest trace information after a program halts. These are only shown if the associated hardware is available on the target.
Each of these GUI elements is described along with the associated functionality elsewhere in this document.
Layout Panel
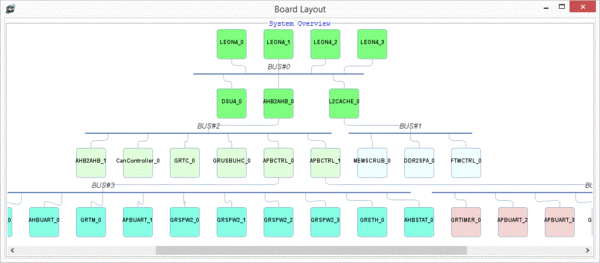
When the board configuration is established on start up a graph of the devices and the buses to which they are attached is calculated and displayed in the tabbed panel on the right. This display can be scrolled and can also be made a floating window. Clicking on any of the nodes in the graph brings the associated device widget to the foreground in the device widget display where it is highlighted.
Device Widgets
A widget is added to the display on top of the DMON window for each device identified on the board; in addition there is a composite CPU widget which pulls together the different processor cores, allowing them to be activated.
These widgets are tiled in a line across the top of the DMON window, filling the available spaces, and then stacking. A double click on the “+” symbol on any widget will open it as a floating window.
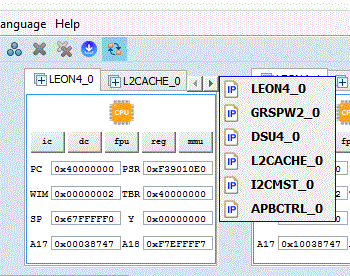
If the mouse is brought close to a stack a drop down list of which devices are in the stack is displayed and one can be selected to be brought to the foreground.
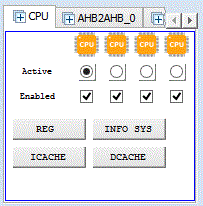
In a multiprocessor system there is a summary widget for the CPUs. The “active” CPU preselects a CPU for commands, see the “cpu” command; and as the buttons on this widget issue commands, they apply to the active CPU only. Only one CPU can be selected as “active”. If a CPU is not enabled it cannot be started by an application running on the target. The colour of the CPU icon changes according to the status.
Powered down Running Debug Error Halted
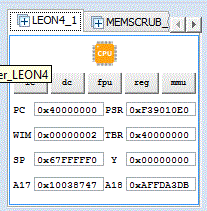
Each CPU has its own widget, varying slightly according to the CPU. The diagram shows a LEON 4 widget. The buttons open a further widget to deal with the specific item. The register displays are also clickable and display register details as is done for other widgets.
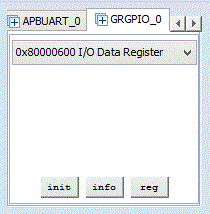
The standard widget for each device shows three buttons, and if there are registers in a device, a drop down list of those registers. The init button calls the init method on the device – in many cases this is an empty operation but for some widgets it will reset registers. The init method is also called after board initialisation.
The info button prints the information that applies to this device in the “info sys” command output. At a minimum it shows that Name, version and address ranges.
The reg command will print the registers associated with the device, if any, to the DMON console.
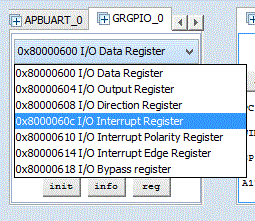
The drop down list allows the user to select a register in the device to be displayed in a dialog which has greater detail and permits modifying the register.
Register Dialog
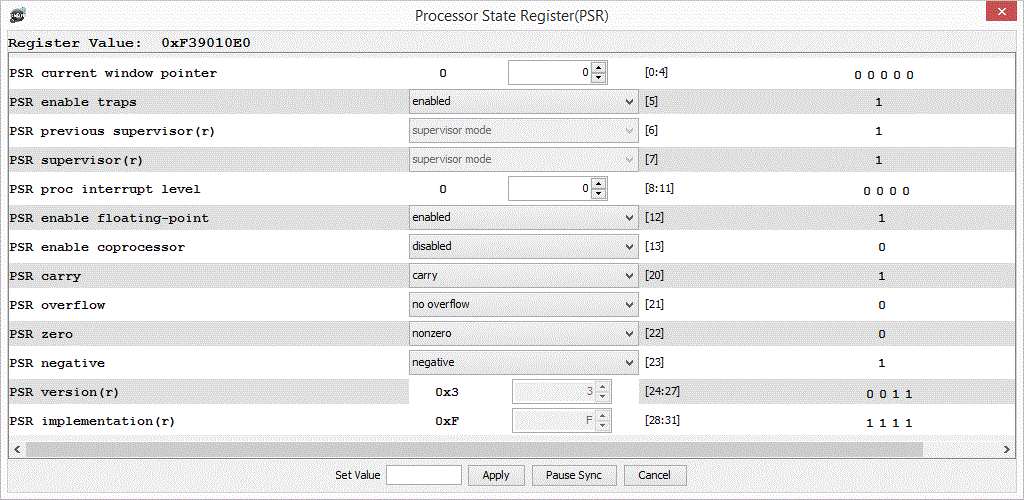
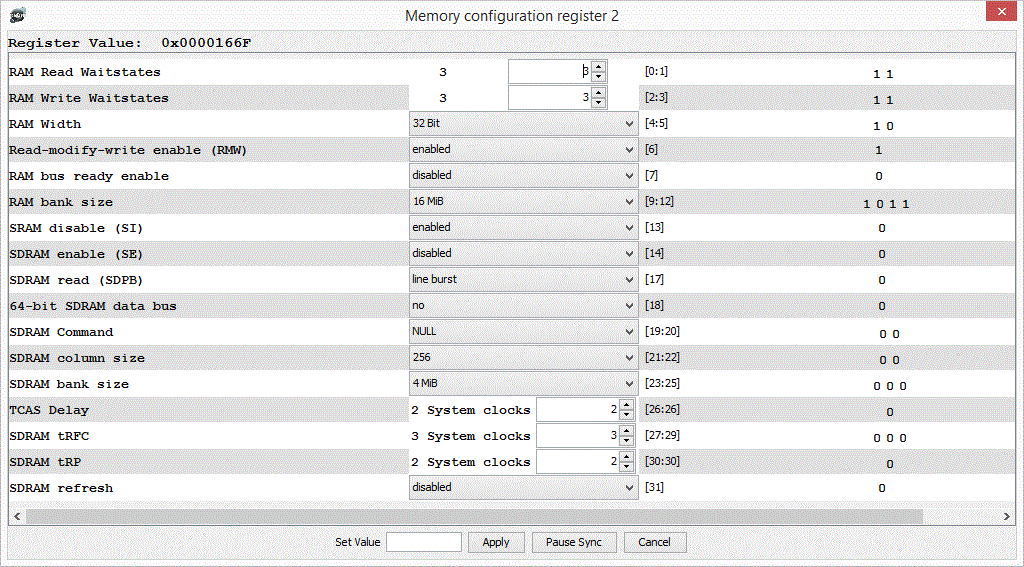
Each register in each device can be edited and displayed via a GUI element similar to the one below:
• The title of the widget shows the register name according to documentation
• The register value is shown as a 32 bit hexadecimal value
• Each field in the register is displayed
- o Read only fields are not editable
- o A single bit field will be displayed as a drop down list with the active value selected
- o Multi bit fields may be treated as integers or as enumerations; in the case of integers an offset and/or scale may be applied in the display – for example TCAS Delay above.
- - Integers can be changed by typing a new value in the editable window; the human readable value is shown to the left, with units as appropriate.
- - Enumerated values can be chosen from the drop down list.
- o On the right of the widget the bits are displayed; clicking on a bit toggles its value and this will be reflected in the rest of the display.
- o The register value on the board is polled in the background. Changes made in the dialog are not applied to the board until the “Apply” button at the bottom is pressed. To facilitate changing fields, the “Pause Sync” button can be pressed, then the value will no longer be read from the board. The button will become a “Resume Sync” button; values can be read again from the board by pressing it.
- o A literal value for the whole register can be entered in the dialog window in the same row as the buttons.
- o “Apply” applies the edited value to the hardware register
- o “Cancel” closes the dialog without making any changes
Console commands
The commands available depend on the target system to which DMON is connected. If a particular device is not present, the commands associated with it also will not be present. The help command lists the currently available commands.
Console commands are typically of the form command parameter1 parameter2 etc. Spaces or commas are used as parameter separators. A comma is required only when a parameter starts with plus or minus and follows another parameter, e.g. write 0x40000000 + offset , -20 & 0xffffffff 10 writes the value 0xffffffec to 10 words starting at address 0x40000000+offset.
When command parameters represent integer values they may be given as expressions that involve numerals, symbols and operators.
A full list of DMON command is given here.
Expressions and symbols
A command parameter that is an integer can be given as an expression involving numerals, symbols and operators, e.g. examine 0x40000000, examine main, examine main + 0x1000 * (count + 1).
Operators are +,-,*,/,%,>>,<<,&,^,|, (, ), with the standard precedence, so evaluation order may differ from that in which operators appear, e.g. examine 2+3*4 evaluates to examine 14, not to examine 20.
Binary numerals start with ‘0b’ or ’0B’, hexadecimal with ‘0x’ or ‘0X’, other numerals that start with 0 are octal (N.B.), and numerals that do not start with 0 are denary (base ten).
Symbols begin with an alphabetic character or underscore ‘_’. They do not contain white space, control characters, the character ‘:’ nor the characters ‘[‘ or ‘]’ .
Expressions can include white space, and evaluate to 64 bit long integers. Some commands may reject parameters outside a 32 bit range, making it necessary to 'and' a result with 0xffffffff. In particular this may be needed when results have negative values.
Symbols may be user defined or come from one or more loaded program images. There are also internal DMON symbols generally not used after DMON startup.
The same symbol may be defined in different sources. The instance to use can be specified by prefixing the symbol with a source identifier, e.g. myfile3:main, _user:a.
When a source identifier is used, the symbol is looked for in that source only. Evaluation fails if the symbol does not exist in that source, even though it exists elsewhere.
When no source identifier is used, a symbol is looked for first in DMON’s internal symbols, then in user defined symbols, and finally in the program images. If it cannot be found, or exists only in program images but with differing values, evaluation fails.
A warning is given if a user creates a symbol that conflicts with an existing symbol. The definition takes place and will shadow that symbol in loaded images unless a source identifier is used.
The value associated with a symbol can be found in a number of ways:
   lookup symbolname      returns the value currently associated with symbolname.
   find symbolname        finds all occurrences of the symbol unless symbolname includes a source identifier
                              (e.g. myimage:sym), in which case only the specified source is searched.
All symbols that occur in the currently loaded images can be displayed in value order:
symbols <file> show all symbols in currently loaded images or adds symbols from a file.
Further commands are provided for dealing with user defined symbols.
User defined symbols
In client-server mode, user defined symbols are known only on the client.
User defined symbols can be constants or variables.
- Constant symbols are assigned a value calculated when the symbol is defined. This only changes when the symbol is redefined
- Variable symbols are assigned an expression. This is re-evaluated each time the symbol is used
Commands:
   setv symbolname expression      create a constant symbol, the expression is evaluated when the
                                       ‘setv’ command is executed, and a 64 bit long integer value
                                       assigned to the symbol.  Any language in use has its symbol table updated.
   set symbolname expression       create a variable symbol,  the expression is re-evaluated each time the
                                       symbol is used. Any language in use has its symbol table updated with the
                                       initial value only.
   show <symbolname>               shows the expression or value corresponding to the given symbolname,
                                       or shows all user defined symbols in alphabetical order.
   delv [symbolname|#]             delete the user defined symbol or delete all user defined symbols
Examples :
   setv a 5        a now has the value 5
   setv b a + 7    b now has the value 12
   set  c a*b      c will evaluate to 60 when next used
   setv a 3        a now has the value 3
                   b is still 12, unchanged
                   c will evaluate to 36 when next used
Lookup can be restricted to user defined symbols only using the source identifier “_USER:” or “_user:” .
If no source identifier is given, user defined symbols are shadowed by DMON’s internal symbols as these are looked up first. User defined symbols themselves take precedence over symbols defined in the loaded program images.
